

I discovered my absolute favourite method of growing tomatoes year round in 2024. I have mentioned previously I have wilt problems in my raised beds. Only VF-resistant tomato varieties will grow in them. I leave my raised beds for other crops and grow tomatoes in big buckets. In this tropical environment, I need a method that allows me to isolate any disease and allows the tomato to establish a deep root system to ease water stress and maximise nutrient uptake. The buckets have been my solution for that coveted all year growth and are well worth consideration in FNQ.
This resource on disease resistance from Cornell University is well worth bookmarking. Many heirlooms have VF resistance but it isn’t mentioned on the packet. Varieties marked ‘VF’ (as in ‘Roma VF’) are predominantly hybrids, but not all hybrids are VF-resistant. That’s a very important distinction. It isn’t a complete list and features many varieties we don’t get here in Australia. I regularly check that to see if I need to baby a variety before planting. As many of my preferred varieties are not VF-resistant, I grow tomatoes in 20L buckets with tomato cages and drip-bubbler irrigation.
I believe that the tropical environment allows disease to take hold with more aggression than a temperate environment allows. Fungal diseases can set in after 2 days of constant rain. Sometimes it rains for 2 weeks straight. Bugs don’t go dormant with chill up here. They are a year-round scourge.
Big (Mostly White) Buckets
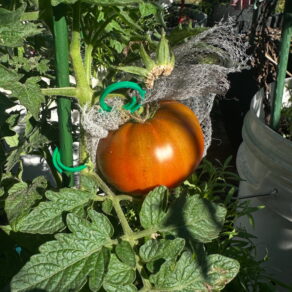
I plant in 20L tall polypropylene buckets. I drill 5 holes into the base and drill 4 around the outside for drainage using a 10mm drill bit. Each bucket has a single tomato seeding and one companion plant planted into it. 2024’s companion plants were alyssum, marigolds and pansies. If I am growing directly from seeds, I’ll plant 2-3 seeds and thin them out later.
Each bucket has water from a drip bubbler connected to my irrigation system. Once the seedlings are tall enough, a thick layer of sugarcane mulch goes into the bucket. Installing a cage early minimises root disturbance later.
Advantages of the Buckets
Bucket pots are quite convenient in the garden.
- Easily cleaned: I sterilise with a bleach solution. Scrubbing them is easy. Hosing them out is simple.
- Good shape: A tall and narrow shape allows tomatoes to establish a deep root system. The tomatoes suffer less from heat stress.
- Mobility: they come with a convenient carrying handle. I’ve moved them about a few times using the handle and it’s just so convenient.
- Footprint: The narrow shape takes up less room in the garden, excellent for small spaces. I can fit more of these in my paved area than I could in traditional pots.
- Stable: The buckets are very stable even with a giant sprawling tomato hanging out of it. Only in the trade winds with very tall varieties have I had to stabilise the outermost buckets.
- Isolation: The buckets isolate soil-bourne disease to that one bucket. I keep a close eye on my patch and remove any plants that are suspicious.
- Production: good hygiene, excellent root system, mobile to catch the best growing conditions, all this leads to high fruit production.
I will be moving to all-white buckets to better reflect the sun. Unfortunately, I had to take what was available at the time of purchase. For some reason, the local big green shed runs out of these buckets quite often.
During Cyclone Jasper, I found I could not lay tall plants in traditional squat pots or grow bags down so they would not act as windsails. These buckets lay down, can have the plant close to the ground and not lose soil. I’m quite comfortable gently laying them down. This is an odd point, but worth noting.
Disadvantages of the Buckets
- Destructive process: Drilling holes in perfectly good buckets means they are permanent pots.
- Expensive: They aren’t cheap if you buy new from the big green shed or somewhere like it. If you know someone in food service, it’s possible they have these lying about. Offer to take some off their hands!
- Longevity: Polypropylene (PP) is plastic resistant to chemical attack. I just don’t know how well it stands up to being in the sun for years. PP can be stabilised against UV. I do not know if these buckets have had that process applied to them.
- Too narrow for my preferred cage: This is more of a slight annoyance than anything else. I use clip-together tomato cages, and the cross bars are just a bit too wide to suit the buckets. It doesn’t matter so much when I’m bracing further up the stakes, but close to the bucket is difficult.

Ugly Aesthetics
I’ll be honest. It’s not pretty. They’re some butt-ugly buckets. They look terrible when the seedlings are barely poking above their mulch with the cages standing up like alien antennas. They certainly belong in my chaos garden where I allow plants to do their own thing with very little constraint.
If you want all year production over dry season prettiness, this is a fantastic way to do it. This method has proved to be an absolute banger for me in the tropics. I grew 20+ different varieties in 2024. Most plants in these buckets just cranked out fruit. Comparing to other methods I tried, these buckets just sneezed over the competition.
In the prime growing season, I can collect a 100mm pot (who needs a harvest basket?) overflowing with cherry tomatoes daily from these plants. When beefsteaks came into fruit, I had to move to a 10×20 seedling tray to collect everything. Unfortunately, I was away for a month in that prime growing season. The indeterminate plants did not have thier usual sucker management happen.
Alternatives to Buckets
Looking hard at the above photo, you might spot a grow bag among the buckets. I have tried grow bags for years, and moving forward, I will remove them from my growing practice.
In FNQ, I aim to manage my tomatoes, eggplant, and chillis as perennial plants, not as annuals. My climate allows for potentially all year growth, and I have succeeded with this in eggplant and chilli production. I have a two-year-old eggplant and a three-year-old chilli. Both are in containers and have been there since I planted them.
4 Years of Chilli
The Serrano chilli is currently in a 40cm squat pot. I repot and refresh its potting mix every six months, trim it up a little and rough up its roots to stop spiralling around the pot. It has survived a whitefly infestation and neglect during periods of extreme illness and still pumps out those tasty pods. This legend of a plant has smashed the all year growth record and still continues to rock on.
3 Years of Eggplant
The eggplant is of the amethyst variety and is in a grow bag. It cannot be moved. I suspect it has grown through the grow bag and into the ground, becoming an odd, sprawling shape. Soil is topped up regularly since I can’t repot it like the chilli. I added an olla spike to ease the water extremes, as sometimes it looks like it is dying from thirst. Despite this, it continued pumping out fruit regularly. The grow bag, after three years in the tropics, is disintegrating around the eggplant. The eggplant has ceased production after 3 years of all year growth so 2025 is the year it gets the chop.
Three years ago, I had another eggplant, a black beauty, do the same thing. I needed my pruning saw to cut through the roots that grew through the grow bag. I could not cut them with my knife or pruners.
Not a Fan of Grow Bags for All Year Growth
I have had roots grow through grow bags before, so I don’t find that the touted ‘air pruning’ of the roots works in a tropical environment. I think things grow so aggressively up here that if there is the slightest bit of weakness in that geofelt – the roots will find it, work at it, and do whatever they want. These roots aren’t encountering oxygen and stopping their growth. They’re just tearing straight through, looking for more soil.
No matter where I purchase from, within 6 months there are holes in the base of the grow bags where bugs, roots, or possibly rot is breaking through. I’ve had plenty of them tear when I’ve gone to move them.
Tropical Environment Degradation
The fabric has that nasty disintegration I recognise from UV degradation under our harsh sun. It’s hard to describe accurately. It’s as if you have a solid piece of a material, and when you apply even light force, it just breaks apart into tiny pieces. Not shattering, but just falling apart. Ancient ‘decorative’ pots do it, tarps do it, but that’s typically years and years of sitting in the sun, not at max, 2 years.
I have found that plants in the grow bags suffer more from dehydration than those plants in pots. My spike ollas with a water bottle attached to them are what I use to keep them hydrated between waterings. Tomatoes and chillis both dislike irregular water and show this through flawed fruiting, blossom end rot and the like. The plants growing in these bags show stress when it’s extremely hot.
And finally, for the last reason why I won’t use grow bags any more: they topple over when the tomato gets too tall and there’s a bit of wind about. As they aren’t rigid, they collapse and spill the loosened soil.
The End of the Growing Life
As old plants slow down, succumb to disease, or die off, I can easily clean and recycle their entire container and growing medium once they’ve made it to the chopping block. It isn’t counter-intuitive to cull some down. The all year growth goal is a constant. I don’t plant everything at once and then remove everything all at once. Determinates don’t produce indefinitely, so once they’re finished fruiting, they get ripped out and the bucket renewed.
I remove the plant from the bucket, along with any stakes or cages, and tip the potting mix into my garden cart. I loosen up the soil, remove most of the thicker root matter, comb through it for worms and grubs and relocate those to other garden beds or the compost pile. If the tomato is ‘clean’ and shows no signs of a persistent disease, the soil gets rejuvenated and reused. Sometimes, I use it to top up garden beds; other times, it goes straight back into pots.
If I see or suspect a disease that will linger, like fusarium or verticillium, I solarise the potting mix and rejuvenate it for later use. I am not equipped to solarise on large scales (yet). The mix gets bagged up in a recycled potting mix bag, and left on sheet of roofing iron. For six weeks it sits in the sun, and turned regularly to mix it around. Once the six-week period is up, I’ll rejuvenate the mix with manure and other amendments for reuse. I do try not to use it in anything I’m planting Solanaceae or dahlias into. I have experimented with using it for tomatoes again but prefer rotating crops as best practice.
Buckets and Disease
Buckets isolate one key factor: the soil. It is the soil borne diseases and parasites that buckets limit. The tomato grown in a bucket is in the same air as a tomato grown in the garden bed. Air borne diseases and pests are still going to affect the bucket grown tomatoes.
However, the tropical climate allows soil bourne diseases and pests to proliferate. The sheer ease of isolating my tomatoes from the native soil or infected beds with bucket growing has improved production and overall health of the plants.
Wilt Disease
I have had only one tomato grown in a white bucket show signs of a wilt disease. Almost overnight, it went from a healthy, established plant beginning to set fruit to drooping during the day. It would perk up with a watering, then begin the cycle again. The buckets made isolating it from the rest of the patch simple. I confirmed it had a wilt virus when I took cuttings of lower branches with clean shears and saw the telltale brown staining inside the stem.
The diseased plant was disposed of in the household rubbish and did not composted. I am not sure how this plant picked up the wilt, as no others had any signs. Like the one in the next section, it was sitting on the ground and not on pavers so I assume it got it from the native soil.
The crossbars of the cage and the olla spikes were soaked overnight in a bucket of bleach water to ensure thorough cleaning.Treating the stakes and bucket required a quick rinse well away from the garden to remove loose soil. I took them to my laundry and scrubbed them with straight bleach, let them sit for a little, and then rinsed them with fresh water. All items sat in the sun for several days before I used them again.
I am still solarising the soil from that bucket. It is tempting to see how well solarisation works by growing another tomato in the same soil to see if my method worked or if I must amend my practice.
Nematodes
At the end of last year’s prime growing season, I removed a tomato that had not performed very well at all. For an indeterminate tomato, it had not grown very tall at all, fruit were late and few and far between, with patchy flowering. It was a bucket that was not sitting on the paved area, but rather, had sat on the ground nearby.
When I ripped out the tomato, I found clear signs of root knot nematode. As you can see from the photo below, the roots are swollen and knotted from where the nematode has infested them and caused all the issues with my stunted plant.

Root-knot nematode isn’t the worst disease a tomato can get, but it is problematic. The nematodes are in the soil and need to be treated before planting anything succeptible to nematodes or the cycle repeats itself. Unlike with the wilt diseases, you can limp the plants on and get some production, but it’s not impressive and better to just rip it out and start over, and disposed of the infected plant in household garbage, not compost it.
Treatment
When I am actively treating the soil for a nematode infestation, I tend to use an old time method of drenching the soil with molasses mixed with water. I tend to use about 4 tbsp of molasses to a 9L watering can and soak the bed with it. Molasses works by increasing the food source for bacteria in the soil and changes the balance of the bacteria vs fungi vs nematodes in the soil. It is a once off treatment as we don’t want to throw off that balance too far. Once treated, then I plant a cover crop to further discourage nematodes and restore nutrient and blaance to my soil.
My cover crop of choice is the biofumigation mix from The Seed Collection. I add seed from my dead headed marigolds to the mix and sow heavily in my garden beds to chop, drop, and dig in later. Marigolds from the Tagetes species produce a chemical in their roots that suppress the populations of nematodes and other pests.
Another method I have considered, but not tried, is using beneficial nematodes to kill off the root-knot nematode. You can buy them from specialist suppliers. As I’ve been able to successfully treat mine with molasses and cover cropping, I have not tried it.
The Common Factor in Both Diseases
After discovering this problem in one bucket, I was able to isolate the soil, treat it, and remediate the soil back into my garden. I practice crop rotation and so that soil is used for a different crop, often sweet potatoes, as they produce more tubers and less leaf with a nitrogen depleted soil. I believe that because I had that bucket sitting on the ground, nematodes moved up into the bucket from that point. Other tomatoes planted in the same batch of soil did not suffer the nematode problem. Interesting that it only affected one bucket, despite several sitting on the ground, isn’t it?
Buckets in 2025
It is April of 2025, and my buckets are sterilised, stacked, and waiting to be filled with soil for this year’s crop. I look forward to trying some new varieties along with my old favourites this year. The weather has been unfavorable this year with a record breaking wet season. But so far this April we’ve had some lovely sunny days and my first round of tomato seedlings are producing their first set of true leaves, so they’ll be ready to plant soon.
The tomatoes I planted in 2024 carried on flowering an producing limited amounts of fruit during the hot dry, the hot humid, and the humid wet during the 2024-2025 summer. I did cull them down to a handful and then in February of 2025 I ripped all of them out and cleaned the buckets. Having half a metre of rain in the space of two weeks knocked all the fruit and flowers off, split what fruit was left, ripped the leaves until they were nearly mush and then whitefly and mealy bugs took advantage.
I learn more and more with every year of gardening that comes. I think I have some strategies for this year even if we do get another massive wet season. Buckets are, of course, infinitely portable. Just because tehy started in the paved area, doesn’t mean they have to stay there. 2025 might just be the year of all year tomato growth in my tropical garden.


Finally, good experience advice I’ve been looking for.