

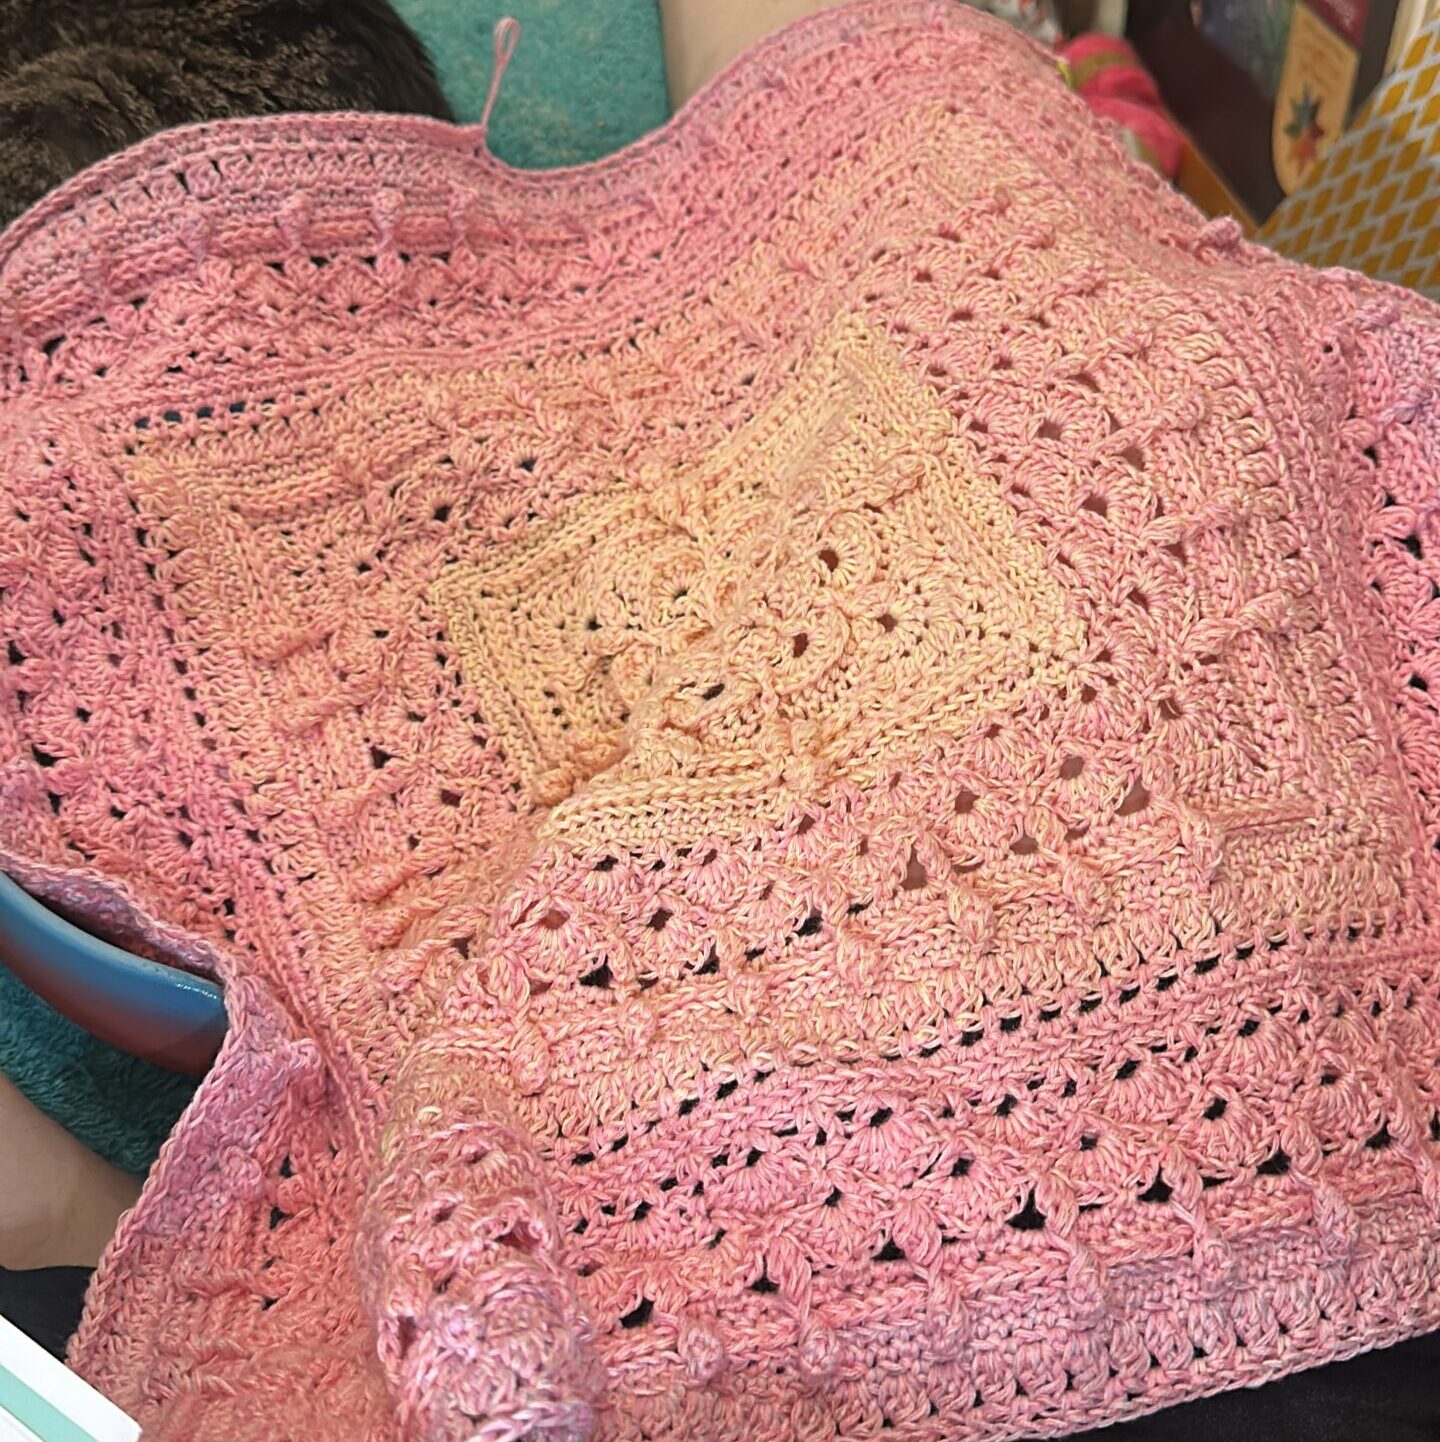
I recently completed this heirloom project, which was a lovely baby blanket called ‘Doo-Dad’. When I crochet, I intend for things to be cherished heirlooms. If I’m going to spend my limited time making something, I want it to last a very long time. I crochet gifts for other people or for charity raffles. I want them to mean something to the recipient, something they can proudly use or display. To bring beauty to their lives. To have something made by hand, with intention. To pass down instead of throw away.
Doo-Dad
Doo-Dad is a pattern written in US terminology by Vanessa at Hooked on Sunshine, explicitly designed as a baby blanket. It features a central square of 15 rows, with subsequent 15-row repeats that grow the blanket until you reach your desired size. I love a pattern where the rows constantly change. It can get boring to ch1, sc1 endlessly until I finish my Moss stitch blanket. Change keeps it interesting for me. Hooked on Sunshine patterns are always interesting to do and well written!
The Yarn
My yarn of choice for an heirloom project is a 50% cotton, 50% acrylic, four-strand, unplied yarn hand-wound by German company Garnmanufaktur, known as a Lola Bobbel.
Bellemae Yarns is my preferred supplier for these. Some are preorder-only, while others are permanently in stock.
The yarn is weight 2, or fine-weight. It is made from four threads wound together into a cake. But they are not twisted together, which can be difficult for beginners to work with. I don’t recommend it for a beginner – it can be tricky!

Pastel Dreams is a very popular colourway and is typically in stock at Bellemae in the 300g size. It is truly a beautiful yarn. This colourway features 13 colour changes, from peach to pale green. The colour change occurs when one thread is swapped out for the next colour.
With the mix of fibres, it should not fade with washing or rot like pure cotton will. It feels wonderfully soft and will continue to soften over time. When I create something intended to be loved for decades, I want an heirloom-quality yarn. It feels silkier than cotton alone. It does not have the ‘tooth’ that cotton has, and flows over the hook smoothly.
I had a 300g cake of Pastel Dreams in my stash – 1125m. Making Doo-Dad in the size I wanted would require more yarn than I had, so I ordered a second cake from Bellemae and got started while I waited for the second cake to arrive. With this weight of yarn, you get 375m of yarn to 100g, or 1g = 3.75m.
Constructing an Heirloom
My preferred hooks are Clover Amour, which I modify by shoving the handles through a makeup blender sponge to ease my hands. I used a 4mm, which gave me a nice drape and decent weave.
I controlled the colour changes. I crocheted straight from the cake for the first 15 rounds, using the peach as my central motif colour. I then wound off the rest of the peach, and used my yarn winder to create individual colour cakes from the two Bobbels. I hate changing colours mid-row. It just doesn’t look right to me. It looks like it lacks intention.
You can purchase Pastel Dream as a ‘Bobbel Box’, where instead of one cake, you have all the colours separated into their individual components in larger quantities for bigger projects or for intricate colourwork. I did not have time to have this custom-made and shipped from Germany to Australia, so I used what I had on hand and ordered from Bellemae’s in-stock selection to get the amount of yarn I needed. Can you tell that this is shaping up to be an heirloom blanket just from the yarn alone?
Crochet Time
I started Doo-Dad around February 17 2025, and crocheted continuously for two months. I have a wrist injury that limits how long I can crochet. I typically crochet for no more than an hour before putting it aside to avoid completely destroying my hands and wrists. The central square came together reasonably quickly, as rounds are short. The central square is unique in that I stopped using the peach colour long before I ran out of it. I wanted to highlight the square and then let the colours gently change through the blanket.
Modifying Stitches
I chose to modify one of the stitches to elongate it, which I found more aesthetically pleasing. A 3dc-cl, or three double crochet cluster stitch (US term), is created using the left method, compare to my method on the right.
3dc-cl
YO, insert hook into stitch, pull up loop: 3 loops on hook.
YO, pull through 2 loops: 2 loops on hook.
YO, insert hook into same stitch, pull up loop: 4 loops on hook.
YO, pull through 2 loops: 3 loops on hook.
YO, insert hook into same stitch, pull up loop: 5 loops on hook.
YO, pull through 2 loops: 4 loops on hook.
YO, pull through all 4 loops.
Elongated 3dc-cl
YO, insert hook into stitch, pull up loop: 3 loops on hook.
YO, pull through 2 loops: 2 loops on hook.
YO, insert hook into same stitch, pull up loop: 4 loops on hook.
YO, pull through 2 loops: 3 loops on hook.
YO, insert hook into same stitch, pull up loop: 5 loops on hook.
YO, pull through 2 loops: 4 loops on hook.
YO, pull through 2 loops: 3 loops on hook.
YO, pull through all 3 loops.
If you look very closely at the sample of crochet to the right, you might be able to spot the difference between the elongated 3dc-cl and the 3dc-cl.
The last two stitches in the row being worked are normal 3dc-cl. All the ones before it are my extended version. They are slightly taller with a loop that sweeps across the top of the cluster, which I liked.
Note that I am left-handed. My stitches lean to the right.

I added this extra step while experimenting with the stitch and liked it, so I continued with it. There is a 2dc-cl stitch that appears a couple of times in the pattern, and I simply modified the stitch in the same manner. The difference is subtle, and most people probably wouldn’t notice. It’s just a way I put my own spin on the project.
I followed the rest of the pattern as instructed until I got to the border. The body of the blanket had no further pattern deviations.
Repeat Rows
Once the central square is complete, you repeat a 15-row pattern until you reach the desired size. I decided to complete the repeats until I reached about 1m x 1m.

The pattern gives the stitch count for each round of repeats, which is refreshing. Many patterns assume you’ll follow the instructions exactly and ‘get it right’, but have no guideline for what ‘right’ means. Being able to count when things went wonky – and they did when I wasn’t paying close enough attention – made it much easier to get back on track.
Weaving Ends
Every few rows, I opted to weave in the ends. Each colour had four tails to weave in, and as this is an unplied yarn, individual threads were everywhere!
Weaving them in and trimming them short made this usually tedious ‘finishing’ job much less overwhelming. I did not trim close to the project at this point, but left a tail so I could thread a small needle and continue weaving if needed. I cut them short enough to not tangle together as I worked.

With Lola, the strands are not plied or twisted together. They are loose threads. I opted to split the end and weave in 2 strands in one direction, then weave in the other 2 threads in the other direction.
Convention is to weave about 5cm in, switching direction 3 times. As it’s intended to be an heirloom, I wove in at least 15 cm for every single split tail. It took forever. But I want it to last decades. If a thread works its way loose, the owner can snip it close without fear that it will unravel, many, many times throughout the blanket’s life. Heirloom to me means generational heritage. That definition is at the front of my mind as I work, no matter the medium.
The Border
The pattern offers two border options. I went with the one that had shell stitches as I do prefer the look of it. This is where I deviated from the pattern again, doing only one round of shells. I modified the corners to please my eye, then finished it off, wove in the remaining ends, and called it complete. I like a simple border.
I deliberately saved the final colour, the pale green, for the border. I am incredibly particular about colour transitions and have had custom runs of colours made to complete projects in the exact colours I want.

Finishing Steps
Blocking and Washing
There seems to be two schools of thought among crocheters: block or not to block? And a second one: to wash or not wash?
I am team block, and lately I’m team wash. Why? Let’s tackle ‘wash’ first. Washing allows me to find out if there are any flaws in a project: will the dye run, will the stitches felt, will the tails work free, will the project shrink?
I cannot expect any recipient to never wash their project! Better to find out before I give it away! The blanket needs to withstand the ‘abuse’ of the washing machine and dryer. A baby will love the blanket. Baby isn’t going to leave it pristine. The blanket will be washed many times in its life. Its first wash can be with me, so I can fix any problems that arise.
I follow the care instructions on the yarn label. They can be a mix of gibberish symbols, so when I write my little blurb to the recipients, I’ll make sure they’re noted in plain English. Lola requires a fairly cool wash on the delicates cycle and can be tumble-dried on cool. Easy as.
Lola, being part cotton, is quite heavy when wet. Surprisingly so. It means that a project made from it needs to be dried flat to avoid stretching under its own weight if you don’t tumble dry. This is a good time to set the stitches via blocking.
Team Block
Blocking allows the project to take its final, polished form. It just finishes the project off perfectly. Lolas are 50% cotton, 50% acrylic, so steam blocking will set the stitches and give them a ‘memory’. Washing the project in hot water (not recommended!) will undo this memory.
I washed it with my gentle wool wash, then rolled and pressed it in towels to remove most of the water. With this initial wash done, I started pinning it out on my driveway – only to have a storm roll in. I threw it on top of the ute’s bonnet in the carport, but then watched the dirt turn to mud, so I took it inside.
I live in a small house with very little floor space. It would not fit inside, except in one of two places: the floor of the spare (storage) room, or on our bed.

I decided to block it on the floor of the spare room, since it would take quite some time to dry. Stretched it to full size, pinned it out carefully, then steamed it well. I left the fan on it overnight to let it dry and went back the next day.
To the left, I have prepared Doo-Dad for blocking. The ruler is for straight edges. 16 mats are locked together. My blocking combs and pins are ready.
It didn’t need much blocking. My tension remained fairly even through the project.
Blocking opens up the stitches nicely.
The Next Day
With blocking done, the blanket measured 1.05m x 1.05m. Just as I wanted. I trimmed down the last tails and took it for a photo shoot. It is, honestly, one of the most beautiful things I’ve ever created.
The Last Touches
I crocheted a small granny square with some of the leftover yarn. Then I wrote a brief letter to the expecting parents, including facts about the blanket, the washing instructions, and a wish for the baby, and folded it up. I placed the letter, the original yarn band, and the granny square inside a washing bag and included it in the parcel.
I always include a sample swatch or two with my projects so that the recipient can wash and dry it to test their laundry products on a sacrificial piece, rather than on the large heirloom projects that have had countless hours invested in them. If a product is going to destroy the heirloom project, I’m sure everyone would rather it be the disposable swatch than the project itself.
With the blanket nearly folded, I wrapped it and the washing bag full of goodies in white tissue paper, added a ribbon, and posted it off. It arrived safely and on time.

Finishing Up
With the project now finished and on its way to its new owners, I had time to clean up. I retrieved the yarn winder again and reassembled all the individual cakes into one large cake for later use. I weighed the yarn. 136g remained from two 300g cakes. Converting this to length, I have 611m left if I wish to use it for another, smaller project. This also means that the blanket weighed 464g, and took up 1,740m of yarn. That’s a ton of stitches!
Have you ever measured how much yarn you use in a single stitch? I have, as it’s a handy tool for estimating whether I need to change colours rather than playing yarn chicken. One of my (US) doubles with Lola yarn takes up 8cm of yarn. If this project were purely doubles, that would be 21,750 stitches. Crocheting someone a multi-month project is truly a labour of love.
Would I make Doo-Dad again? Absolutely. I enjoyed the project. It’s an intermediate-level project. Skilled beginners looking to stretch their skills will find this a good project. The pattern is well-written. Sharp photos are there to guide. I could get into a groove with each row. It satisfied my need for constant change. It looks stunning, feels lovely in the hand, and most importantly, the recipients loved it.


Leave a Comment